Glossary of Modern Landscape Photography (Post-Processing) Terms
Landscape photography can be quite overwhelming when you're just starting out. There's just so much to learn, to do and to see. Aside from finding the best composition, you'd have to juggle your camera controls and think about what you want to show the audience all at the same time in conditions that can change on a moment's notice.
If that isn't complicated enough, you're bombarded with all sorts of jargon that can make your head spin. In this article, I want to set out and investigate most of the modern landscape photography techniques. Let's see what they do, and what they are for. This list is very much alive - as soon as I discover new techniques or have better images to illustrate them, this article will be changed.
Camera and Fundamental Terminology
Exposure
Exposure is controlling how much light gets into your photo. You can control that in-camera with the Exposure Triangle, consisting of Aperture, Shutter Speed (Exposure Length) and ISO. We call it the triangle, because you cannot change one without getting a different exposure. You have to change two in order to get the same exposure with different results.
Exposure Triangle 1: Aperture
Aperture is the opening created by the diaphragm. The diaphragm is like a round door that opens from the center. It is nowadays controlled electronically through running a current trough the circuitry to keep it open for set amount of time. In photography, when we talk about f/2.8 or f/22, we are describing how large the aperture is set. The higher the number, the smaller the aperture.
Aperture also controls depth-of-field, lens defects and diffraction.
Exposure Triangle 2: Shutter Speed
The length of the exposure is a measure of how bright your image is going to get. Imagine light gathering on the sensor for an increasing period of time. Like solar panels, if you will. The longer light is falling on solar panels, the more current they generate to power your house. This analogy is quite accurate, because the sensor also translates light into an electric current. Shutter Speed also controls motion.
Exposure Triangle 3: ISO
Last of the exposure triangle is ISO. Depending on which camera you use, the amount of incoming light gets amplified at a particular stage in the camera. This results in a brighter image at the same aperture and shutter speed, but at a cost. ISO also controls noise and dynamic range.
Dynamic Range
The amount of both shadow and highlight detail that can be captured in one image. Dynamic range is measured in EV (Exposure Value), that represents a method of making the values of the Exposure Triangle interchangeable. Let me clarify. Changing the aperture from f/4 to f/2.8 adds 1 full EV (or 1 stop). Modern digital cameras are approaching 15 EV of dynamic range, which is a lot, but not comparable to the human eye. Our eyes constantly adapt to our surroundings and have multiple modes of vision, why it's very difficult to put a number on our eyes. Although it is said that most of us have about 30 EV (or stops) dynamic range!
Depth-of-field (DOF)
Think about focusing on your subject. Everything that's reasonably sharp to the front and back of it, is attributed by the depth-of-field. That's in imaginary 3-dimensional plane that controls the sharpness of your image. Focus controls the distance of that plane, while aperture controls its depth. DOF always fades out to the foreground and to the background. This is why it is important to focus on the things that matter to you in your photos. A shallow dept-of-field can be achieved with big apertures, in which you can blur the foreground or the background. In landscape photography, we usually want a very deep DOF. One that exceeds f/22 in most cases. But small apertures introduce diffraction.

The One you can't Have - A selective or shallow depth-of-field can perhaps best be explained by showing something that's in focus against something that is not.
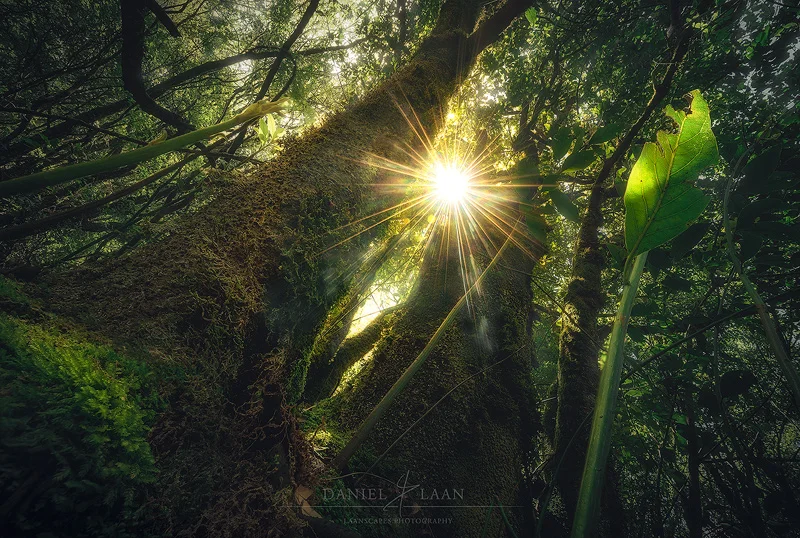
Diffraction
When white light hits your lens at sharp angles, it gets bend around and breaks into many different colors. The colors hitting your sensor as a result, look distorted and unsharp. When we talk about diffraction, we mean that the image quality, and particularly sharpness, reduces at small apertures. This is why you wouldn't want to shoot at f/22 if you can choose "better" apertures like f/8 or f/11. Diffraction can be overcome by shooting with an aperture that's more open, but that lowers depth-of-field, which is often undesirable in landscape photography. Diffraction also generates sunstars.
Motion
You can control the amount of apparent movement in a scene through either the shutter speed or intentional camera movement. In landscape photography, a short shutter speed is any setting that completely freezes any motion in the image and does not considerably introduce noise. So at night, in the right conditions and with a short focal length, you can expose for 30 seconds and still talk about a short shutter speed. 1/50 of a second in stormy conditions can be called a long exposure, because you do not freeze all motion in foliage with that setting.
Focal Length
Focal length is the distance between the sensor and the point of convergence of light in the lens, also called the Nodal Point. This point is important in successful panorama stitching. Lenses with short focal lengths are called wide-angle lenses, because they capture sweeping wide landscapes with many small subjects. Telephoto lenses have a longer focal length, which help to isolate a subject. Anything under 35mm on full-frame cameras is called a wide-angle lens. Anything above 85mm is called a telephoto lens. Anything in between is called a normal or standard lens. 50mm is often called the true standard lens, because it is supposed to give an impression of what the human eye sees. Aside from the size of your subject in the frame, focal length also controls motion, depth-of-field and perspective.

Where the Dunes are Born Anew - I just love the compressing effects of the telephoto lens. It is why I use it often to capture serene, intimate landscape scenes such as this grass in the Dutch dunes.
Lens Defects (distortion, chromatic aberration, coma, etc.)
Lenses bend light. In doing so, light gets distorted and breaks apart into its colors. The more extreme the angle in which it gets bent, the more apparent the results of that bending. Purple and green fringes, a strange distortion in the image or stars that appear elongated in the corners of the image are all attributed to the quality of the optical elements in your lens. You don't have to invest in a new lens in order to get better quality images most of the time though. Chromatic aberration and distortion are easily corrected in post-processing. Coma can be reduced by stopping down (closing the aperture a stop), although that does of course lower exposure.
Sunstars and Lensflare
If you close the aperture down to f/18 or f/22 while having the sun in the frame, you'll notice that the sun will start to look like an actual star. It depends on your lens how many spikes the sunstar will have, but the length of each spike can be controlled by the aperture setting. Lenses with uneven (odd) amount of aperture blades, will generate twice as many spikes in a sunstar as even numbered aperture blades. Lensflare is related to having a bright subject on the side of the lens. The image will appear washed out (low contrast), tinged orange or green and contains shapes of light. All of this is attributed by a complex interplay of optical elements, lens coating, angle towards the bright subject and your aperture setting. Lens hoods will help to prevent lens flares and lenses with coated front elements will show fewer spots and better contrast under these conditions.
White Balance (Temperature and Tone)
Traditionally, white balance was the setting that recreates pure white in photography. However, the color temperature (blue-yellow) and tone (green-magenta) settings can invoke a different mood to the same scene. It's my opinion to use either to suit the intended atmosphere of the photo. Try finding the balance with equal parts blue and yellow and green and magenta. Either in the field or in post-processing when shooting Raw.
Noise
When we talk about noise in digital cameras, we often refer to high ISO settings. That's just part of the picture. There are many different types of noise which need clarification.
Noise: Signal Noise
Signal noise is monochrome noise that is the result of amplification of the signal. In other words, it is random (black and white) noise that gets into the image the higher your ISO setting. There are two methods of reducing this. The simpler method is to lower your ISO setting. Most cameras also have an in-camera setting called "High ISO noise reduction", that helps, but lowers detail in you image. The complex method is to shoot multiple exposures at exactly the same settings and put them together in Photoshop or specialty programs like PixInsight. This technique is called Stacking and is borrowed from the field of astrophotography.
Noise: Thermal Noise
The warmer the sensor gets, the more it introduces artifacts in your image. Rising temperatures mess with the internal circuitry. Thermal noise is often red or purple in your image. Because of that, the color noise slider in Lightroom for example, will help significantly. Most often, thermal noise is a result of long exposures, not high ISO values. Digital camera's are limited in automatic shutter speeds for this reason. So what can you do about it?
Shorten the shutter speed
Set your camera to "Long Exposure Noise Reduction" (doubles the exposure length)
Shoot exactly the same image right after your exposure with the lens cap on (Dark frame) and subtract it from the first one.
Noise: Hot/Stuck/Dead Pixels
Hot pixels are pixels that get brighter than normal under high current. They appear and disappear and pop-up under either high ISO settings or during long exposures.
Dead pixels are tiny black spots. These are pixels (actually photosites) that are always off.
Stuck pixels are bright spots; pixels that are always on. Unlike dead pixels, stuck pixels can revert to normal over time. And unlike hot pixels, these can stay on in the same spot over multiple exposures.
ISO-Invariance
Some cameras have a strange attribute. It doesn't matter from a noise-perspective if you're shooting at a high ISO to achieve a certain exposure or if you shoot at a lower ISO and boost the exposure in post-processing. Cameras that can do this across ISO ranges are called ISO invariant. Some cameras can do this only across a part of the ISO range, while others can't do this at all. Canon sensor cameras are not ISO invariant, so it is best to always shoot at the intended exposure, even if you have to boost the ISO considerably. Modern Fujifilm cameras have some of the best ISO invariant sensors, while Sony and Nikon sensors are partly ISO invariant. The latter have the best balanced results at ISO 800, while boosting everything above it in post-processing.
Why would you shoot at lower ISO's and boost the image in post?
Less Signal Noise in the shadows - Only increase the exposure where you need it, so noise stays low.
Higher Dynamic Range - Lower ISO settings show more detail in the shadows and in particular the highlights, so you can record and recover more data in either for more attractive images.
Better control Highlight Exposure - Prevent blown-out stars, northern lights and the moon at night with lower ISO settings.

Violet Vajolet - Such detail in the nightsky can only be extracted by layering many images of the Milky Way on top of eachother and using algorithms to separate noise from stars. I've used 8 25-second shots to get this result.
Blending Multiple Images
It is always the photographer's goal of making compelling images. Blending multiple images is a means of circumventing technical limitations to the photographer's vision. Since the dawn of digital photography, blending multiple images together was the biggest controversy. Is an image that consists of multiple shots still photography? We're 30 years into adulthood of digital photograhy and technology still hasn't caught up with many artist's vision. If you ask me, I dread the moment that technology does catch up. It's the nail in the coffin for traditional photography, while at the same time the frontier of creativity gets pushed beyond all that know to be photography right now.
Bracketing
Bracketing is the automation of shooting multiple exposures with one variable. That can be any one setting such as shutter speed, aperture, focus distance or even focal length. The most common bracketing option is auto-exposure bracketing, useful for HDR photography.
HDR (High Dynamic Range) Photography
What HDR is:
A method for incorporating an expanded dynamic range in a resulting image than is allowed by traditional means (i.e. a single exposure).
More EVs (or stops).
Relates to the information about brightness or luminosity.
What HDR is not:
The automated blending process of multiple exposures.
More bits (16 bits as opposed to 14 bit images).
Relates to the information about color.
Note that popular photography and media in the 2000's has made HDR photography into an automated process, involving auto-exposure bracketing and tone-mapping through specialized programs such as Photomatix.
Exposure Blending
Think HDR by hand, or using graduated filters in post-processing but not in the field. Take parts from a brighter image and blend it into a darker image. Exposure blending can be done with more than two exposures, but it gets increasingly difficult to do with more. This post-processing technique is usually done in Photoshop by masking parts of one layers to see parts of the underlying layer(s). The goal is to allow an expanded dynamic range in a resulting image, for more detail in both the shadows and highlights.
Focal Length Blending
The process of using multiple focal lengths to emphasize the relative size of subjects in the frame. This is usually done to make mountains appear as tall as in real life when shooting a landscape with a wide-angle lens. Wide-angle lenses distort our reality in a sense that distant objects appear smaller, while objects at minimum focus distance can look positively gargantuan. This is why I teach that it's important to always get up close and personal with foreground subject matter when you have a wide-angle lens attached to your camera. Focal length blending is a technique that overcomes the limiting factor of relative size, using more than one focal length.

Earthen Abbey - I used focal length blending to get the mountain looking as big as it did in real life, as well as focus stacking to get everything tack sharp for this image of Seceda.
Perspective Blending
The process of using the (wide-angle) lens' inherent optical distortion to overcome the problem of relative size difference through multiple blended images. Think of this as using one focal length for the same effect as with focal length blending. Instead of zooming in, you angle the lens down for the background. The lens' distortion is more pronounced near the edges, which elongates everything from trees to mountains.
Perspective blending is really only useful when you're using a prime lens. Focal length blending is the superior option of the two, because not only your subject gets elongated at the edge of the frame, but also lens defects; hampering the quality of the resulting image.
Focus Stacking
A technique that uses multiple images at different focus distances to allow for more depth-of-field and sharpness than can be achieved through adjusting the aperture. Most wide-angle lenses can be stopped down to f/22. But if you're foreground material is at minimum focus distance, it will be impossible to have both it sharp, and any background at infinity. Moreover, f/22 is far from an optimum aperture setting. Small apertures increase diffraction, consequently softening your photos. Sharp landscape images? Use f/11 and focus stack from minimum focus distance through infinity with 5-10 images, depending on your focal length. Longer focal lengths require more shots at shorter distance intervals.

Last Beauty before Mordor - There are few images that I have not focus stacked in my portfolio. Such sharpness, front to back, cannot be had when focusing a third into the frame.
Panorama Stitching
When your lens doesn't go as wide as you'd like, you can create a panorama using the same lens. Panoramas can be traditionally horizontal (from which it gets its name), vertical (called a vertorama) or both (shooting side-to-side as well as top-to-bottom). Panos can be made with every conceivable lens. I even use panorama techniques on my 14mm lenses to make impressive shots of trees.
One less used option is to use a longer focal length to increase the resolution. This is often used for gigapixel projects where the resulting photo is either printed large, or used for interactive projects where you can zoom in on the tiniest detail in a cityscape for example.
Lens Flare Blending
Using two images to clone out artifacts that are a result of lens flare. Shooting straight into the sun can create great powerful images. But also comes with nasty side-effects. All those optical elements refract and converge light in different ways. That results in uniquely shaped artifacts that can be quite distracting. So here's what you can do to get rid of lens flare artifacts. Put your finger in front of the sun at exactly the same exposure settings as the previous shot (shoot manual). Look at live view (not through the viewfinder!) to see if you got it right.
I also use this technique but with a slightly different approach to make the sun nice and starry. If the sun is in my frame, I always take another shot at f/22, just for the sun. The diffracting aspects of a small aperture have a little side-effect. You're creating a sunstar through light diffracting over the aperture blades.
Are you using filters? Make sure they're nice and clean before you set out to blend images for lens flares. Blending dirty images is a lot more work than clean ones.
Explosive Overgrowth - Sunstar at f/22, over a focus stack of 8 images at f/14. during the focus stack, I've put my finger overhead in the frame over the sun to block it out. Doing so raises contrast and gets rid of nasty artifacts of lens flares in the stack, which are very difficult to remove.
Stacking (In Night Photography)
The process of using mathematics on multiple images to overcome signal noise in (night) photography. Example: take two exactly the same images, shot in rapid succession. The average (add them up, divide by two) of these images should also be the same, right? Well, yes. Except for everything that is random in the shot.
Stacking is done to get rid of everything that's not the same in all (or the majority) of the images in a set. It can lower noise and get rid of passing airplanes and satellites. In professional night photography and astro-imaging, many photos are shot of a same portion of the sky in order to reduce noise. This way, we can enhance the image while keeping the noise low. This is especially useful in your Milky Way images, but not so much when shooting the aurora. It's important that your subject stays still.
While this advanced technique can be done on nightscape images as well, it's important to remember that the slightest amount of wind can disrupt foliage in the foreground. This will work its way into your images as if you're taking a really long exposure.
For the night sky, it's important that the stars are in exactly the same place throughout the images. That can either be done by using a device called a tracker or astro-tracker or by using a telescope mount that automatically counters the rotation of the Earth. If you don't have either, then it can be done in software, but you will lose the edges of the frame where the images don't align. In both cases, it's important to perfectly align the stars to get the sharpest results. There are dedicated programs that can do the aligning (registering) and stacking for you, like PixInsight, Starry Landscape Stacker (Free, Mac only), DeepSkyStacker (Free, severe memory limitations), and a number of others. Photoshop also helps, but it's a painstaking, manual process.
There are multiple mathematical formulas to stack your images. Most commonly, average, median and median with Sigma-Kappa clipping. This results in more detail and less noise. Read more.
Time (Twilight) Blending
Instead of stacking the foreground at higher ISO values to reduce noise, you can allow ambient light at twilight in your image, before or after you shoot the night sky. Not only will you be able to lower your ISO, but you will probably be able to reduce the shutter speed and use a smaller aperture as well.
Twilight blending is, more than the previous techniques, pretty frowned upon in the community, because it "doesn't show the landscape as it is". I disagree, because you can literally do everything with that twilight foreground. It's completely up to the skill and taste of the photographer to make it as close to the foreground at night as possible. The big benefit of course is that you have expanded dynamic range and significantly less noise.
Compositing
A composite image is by its definition an image that is the result of putting multiple photos together. But, with everything we discussed before, I think it's fair to rewrite that definition. I propose that composites are multiple images put together from different places. What's the criterion for calling it bracketing? Must the interval be instantaneous? What about two seconds? Or several minutes? Hours perhaps?

The Dance of Eternity - The landscape was shot at twilight in the far north of Iceland, while the sky and its sweeping aurora was shot way in the south. Much more than an afterthought, I was actually looking forward to making this true composite work in the field. Note that there isn't much noise in the foreground. Something that would be impossible would I have tried to do it all in one shot at night.
Drawing the Line
We are inclined to draw the line at what we already know to be photography. I'm sure that after reading all this multiple-image stuff, you think there's little actual photography left. But photographers are always at the forefront of both art and technology. Our actions determine the fate of future cameras and lenses.
I used to take panorama photos all the time. It took my wife hours of waiting for me at the beach or in the woods, just so I could print an image 2 or 3 times the size. Now we have relatively affordable full-frame cameras with resolutions exceeding 50 megapixels and there's no end in sight in this development.
When I started out with digital photography, I was annoyed at how low the dynamic range was. Shooting in daylight nearly always meant bracketing for exposure. This is why programs like Photomatix were developed in the first place, but now even those applications are obsolete. With a dynamic range in excess of 15 EV, I think that one image is enough unless you're shooting straight into the sun and have blacks in the foreground.
Newer image processors and better electronic circuits as well, allow for ISO values that we dreamed about not 10 years ago. ISO 6400 today looks like ISO 400 from a decade ago on a comparable range camera. That's 2009, mind you! Imagine what 2029 will bring.
And let's not forget optics. Although we have had tilt/shift lenses for close to two-hundred years (bellows work in the same way), we never really appreciated them because of their lack of optical quality versus their enormous price point. But I see myself using them in the near future if they keep being developed. No more focal length blending to emphasize distance mountains or focus stacking to have everything in sharp focus, front to back.
Really, it's what we do with the art of photography that holds us back, not the advance of technology. So, where do I draw the line? As long as I say that it's a composite, I'm okay with just about anything. I'm in this to create art, not to adhere by anyone's standards. But I have to enjoy doing it and I have to enjoy looking at the result. In order to do that, it must look convincing or real enough. Powerful and dramatic, but real enough.
Post-Processing Techniques
Having discussed shooting techniques, I think it's now time to look at post-processing. These are all techniques that are applied after the image is blended into one.
Mask (Luminosity Mask, Saturation Mask, Hue Mask)
The most difficult and important thing to master in Photoshop, because it's a lot of manual labor. Two layers can be blended together by selectively allowing parts of one layer to be shown on top of another layer. A mask is a black and white matte that reveals or conceals the layer to which the mask is applied. Remember that white conceals and black reveals (the underderlying layer).
A luminosity mask is a mask that targets specific bright or dark parts of one layer and blends it with the layer underneath. This usually results in very natural, highly customizable images that are all the rage nowadays. Most professional photographers I know use a panel for Photoshop developed by Tony Kuyper to create luminosity masks automatically. With these, all sorts of adjustments can be made.
Warping
The process of using the transformation tools in programs like Photoshop to change the geometry of a photo. The warp tool is particularly useful to make foreground subjects larger, mountains taller and pulling distracting elements at the edges out of the frame. Don't overdo it, because the sharpness of the image will suffer, mountains will lose their identity and the overall composition can look disgustingly surreal due to all the waviness in your shot.

Flames under the Ice - Using the warp tool with patience and persistence can actually help your composition. In this shot from the Lofoten, I've made sure the line of ice starts at the lower left while leaving a rock out of the composition in the lower right. Be sure that your horizon is level when you're done making geometry adjustments.
Dodging / Burning
Another technique that we inherited from film. Making an area brighter than recorded is called dodging and making it darker is called burning. In Photoshop, you can also add saturation or change the hue during dodging or burning. Just create a soft light layer and start to paint with a soft brush at low opacity. Everything that's brighter than 50% gray lightens your work and everything that's darker than 50% gray will darken the underlying image.
Orton Effect
A technique that evolved out of the hands and mind of Michael Orton, when he used multiple images at varying focus distances and exposures to blend them together on transparent slides for a painterly effect.
Today, the Orton effect is synonymous for a moody look. It makes your image glow. How much and at which scale greatly depends on the techniques used. One such technique is making a duplicate of all the previous layers and blurring that layer with about 50 px Gaussian blur. Lower the opacity of the layer and brighten it up to make it sing.

Whisperwood - The Orton Effect works very well in woodland images. Especially so in misty conditions such as here at Monte Cucco in Italy..
Soft Glow / Diffuse Glow / Light Bleed
Going back far enough, I think the origins lie in the works of Galen Rowell, pushed farther by Marc Adamus and perfected or overdone (depending on your personal taste) by Ryan Dyar. It involves a series of layers set at either Soft Light or Overlay blending modes, and gradually building up opacity over all those layers to emulate natural light at the edges of the frame or central source of light. It can also be very effective at the brightest parts of the image in the foreground, a technique for which all three are known along many others today. Many have different takes on this technique, including Enrico Fossati who selects the brightest parts of an image, fills it on a new layer with a very bright color and then blurs the fill layer by a 1000 px.

Golden Meadow - I used soft glow in this image to emphasize the direction of natural light and the setting sun to create more impact.
Gradient/Graduated Filter
Because modern digital cameras have an increasingly higher amount of dynamic range under the hood, actual graduated filters are becoming more and more obsolete. Not only do I find filters cumbersome, expensive and hard to work with at minus 20 C, they can get dirty, break and put another layer in front of your lens that (albeit very slightly) lower the sharpness of your image.
So any gradients I have in my images are almost always digital gradients in an effort to darken the sky more than the foreground.
Curves / Matte Finish
A film look to digital photos can effectively be gained by applying a curves adjustment layer. lower the midpoint and raise the blackpoint to lose contrast in the shadows, while gaining a look that seems to originate from the film era. Note that slide film did (and doesn't) have this faded look. It can drastically make one image look different than the other, so if you use this sparingly, it can create incoherence in your work.