5 Levels of Landscape Astrophotography
Level 1: All in one shot and basic settings for great nightscape photos
When you first start out with landscape astrophotography, the first question that you might ask is: “which exposure settings do I need?”. Here are a few starting points for Milky Way photography:
Aperture: f/2.8 or as large an aperture (small number) as you can go.
Focal length: 14 to 35 mm work best in order to show both stars and foreground.
ISO: 3200 or 6400.
Shutter speed: 10-30 seconds, depending on the focal length.
All of these settings require more explanation in detail and come with one or several caveats. That is why this article is so long!
Tripod
The only way to get sharp results is to mount you camera firmly on a tripod. Turn off image stabilization.
Manual mode
Firstly, your camera is unable to determine the correct exposure in the depth of night. That is because there is not enough light for the metering system to measure and set the exposure automatically. That means that you need to switch to manual mode.
How to focus at night
For the same reason as above, no auto focus system on the market at the time of writing can focus your nightscape images for you: it is simply too dark for contrast and phase detection autofocus to get a sharp nightscape photo. So here’s my workflow in the field.
Switch to manual focus.
Open up the aperture as much as you can.
Point the camera towards one of the brighter stars in the sky. Sirius, Rigel and Aldebaran work well. Planets like Venus, Mars and Jupiter are also well suited to help you focus. As a last resort, you may use a distant artificial light on the horizon to help with focusing.
Use live view and zoom into the screen using the plus button on your camera.
Make the star (or planet) into a pin prick in the center of the frame by rotating the focus ring by hand, making that point of light as small as you can by eye.
Zoom out, increase the ISO to a ridiculous setting like 25600 and do a test shot for the composition. Readjust the composition if it’s not pleasing, or refer to the settings above if you’re happy with the framing of the sky and landscape.
Shoot using regular settings for nightscapes.
Aperture
The first caveat is the wide-open aperture. While you do want to open the aperture as much as you can in order to let in more star light and make the Milky Way look more impressive, there are a few problems that can arise. The larger the aperture, the more shallow the depth-of-field. That means less will be in sharp focus throughout the frame. Especially when you are close to a foreground subject, which I highly recommend.

Lens aberrations - the nightscaper’s worst enemy (well, aside to light pollution of course)
Coma is a lens defect that will show up more on wide-angle lenses with the aperture opened up all the way. It has to do with the way light breaks through all that glass inside your lens and hits the sensor. Some lenses have better coma correction than others, which we will get into later. Coma will show up as elongated stars in the corners of the frame, that fade out like the tail (or coma) of a comet. Other aberrations include tangential astigmatism, which shows stars as streaks in the corners that are brighter in the center in the direction of the image center, sagittal astigmatism which is the same, only rotated 90 degrees, spherical aberration producing fuzzy stars and chromatic aberration showing a shift of colors. In practice, it’s almost always a combination of each:


These are all taken with different lenses at their maximum aperture. To get rid of these unsightly lens defects, you really only have two options: close the aperture and let less light in as a result or get a lens better suited for this particular field of photography. Sometimes due to bad quality control or external damage to the lens, lens elements are shifted within. That may produce all sorts of visual nasties. The worst that I encountered was a decentered lens:

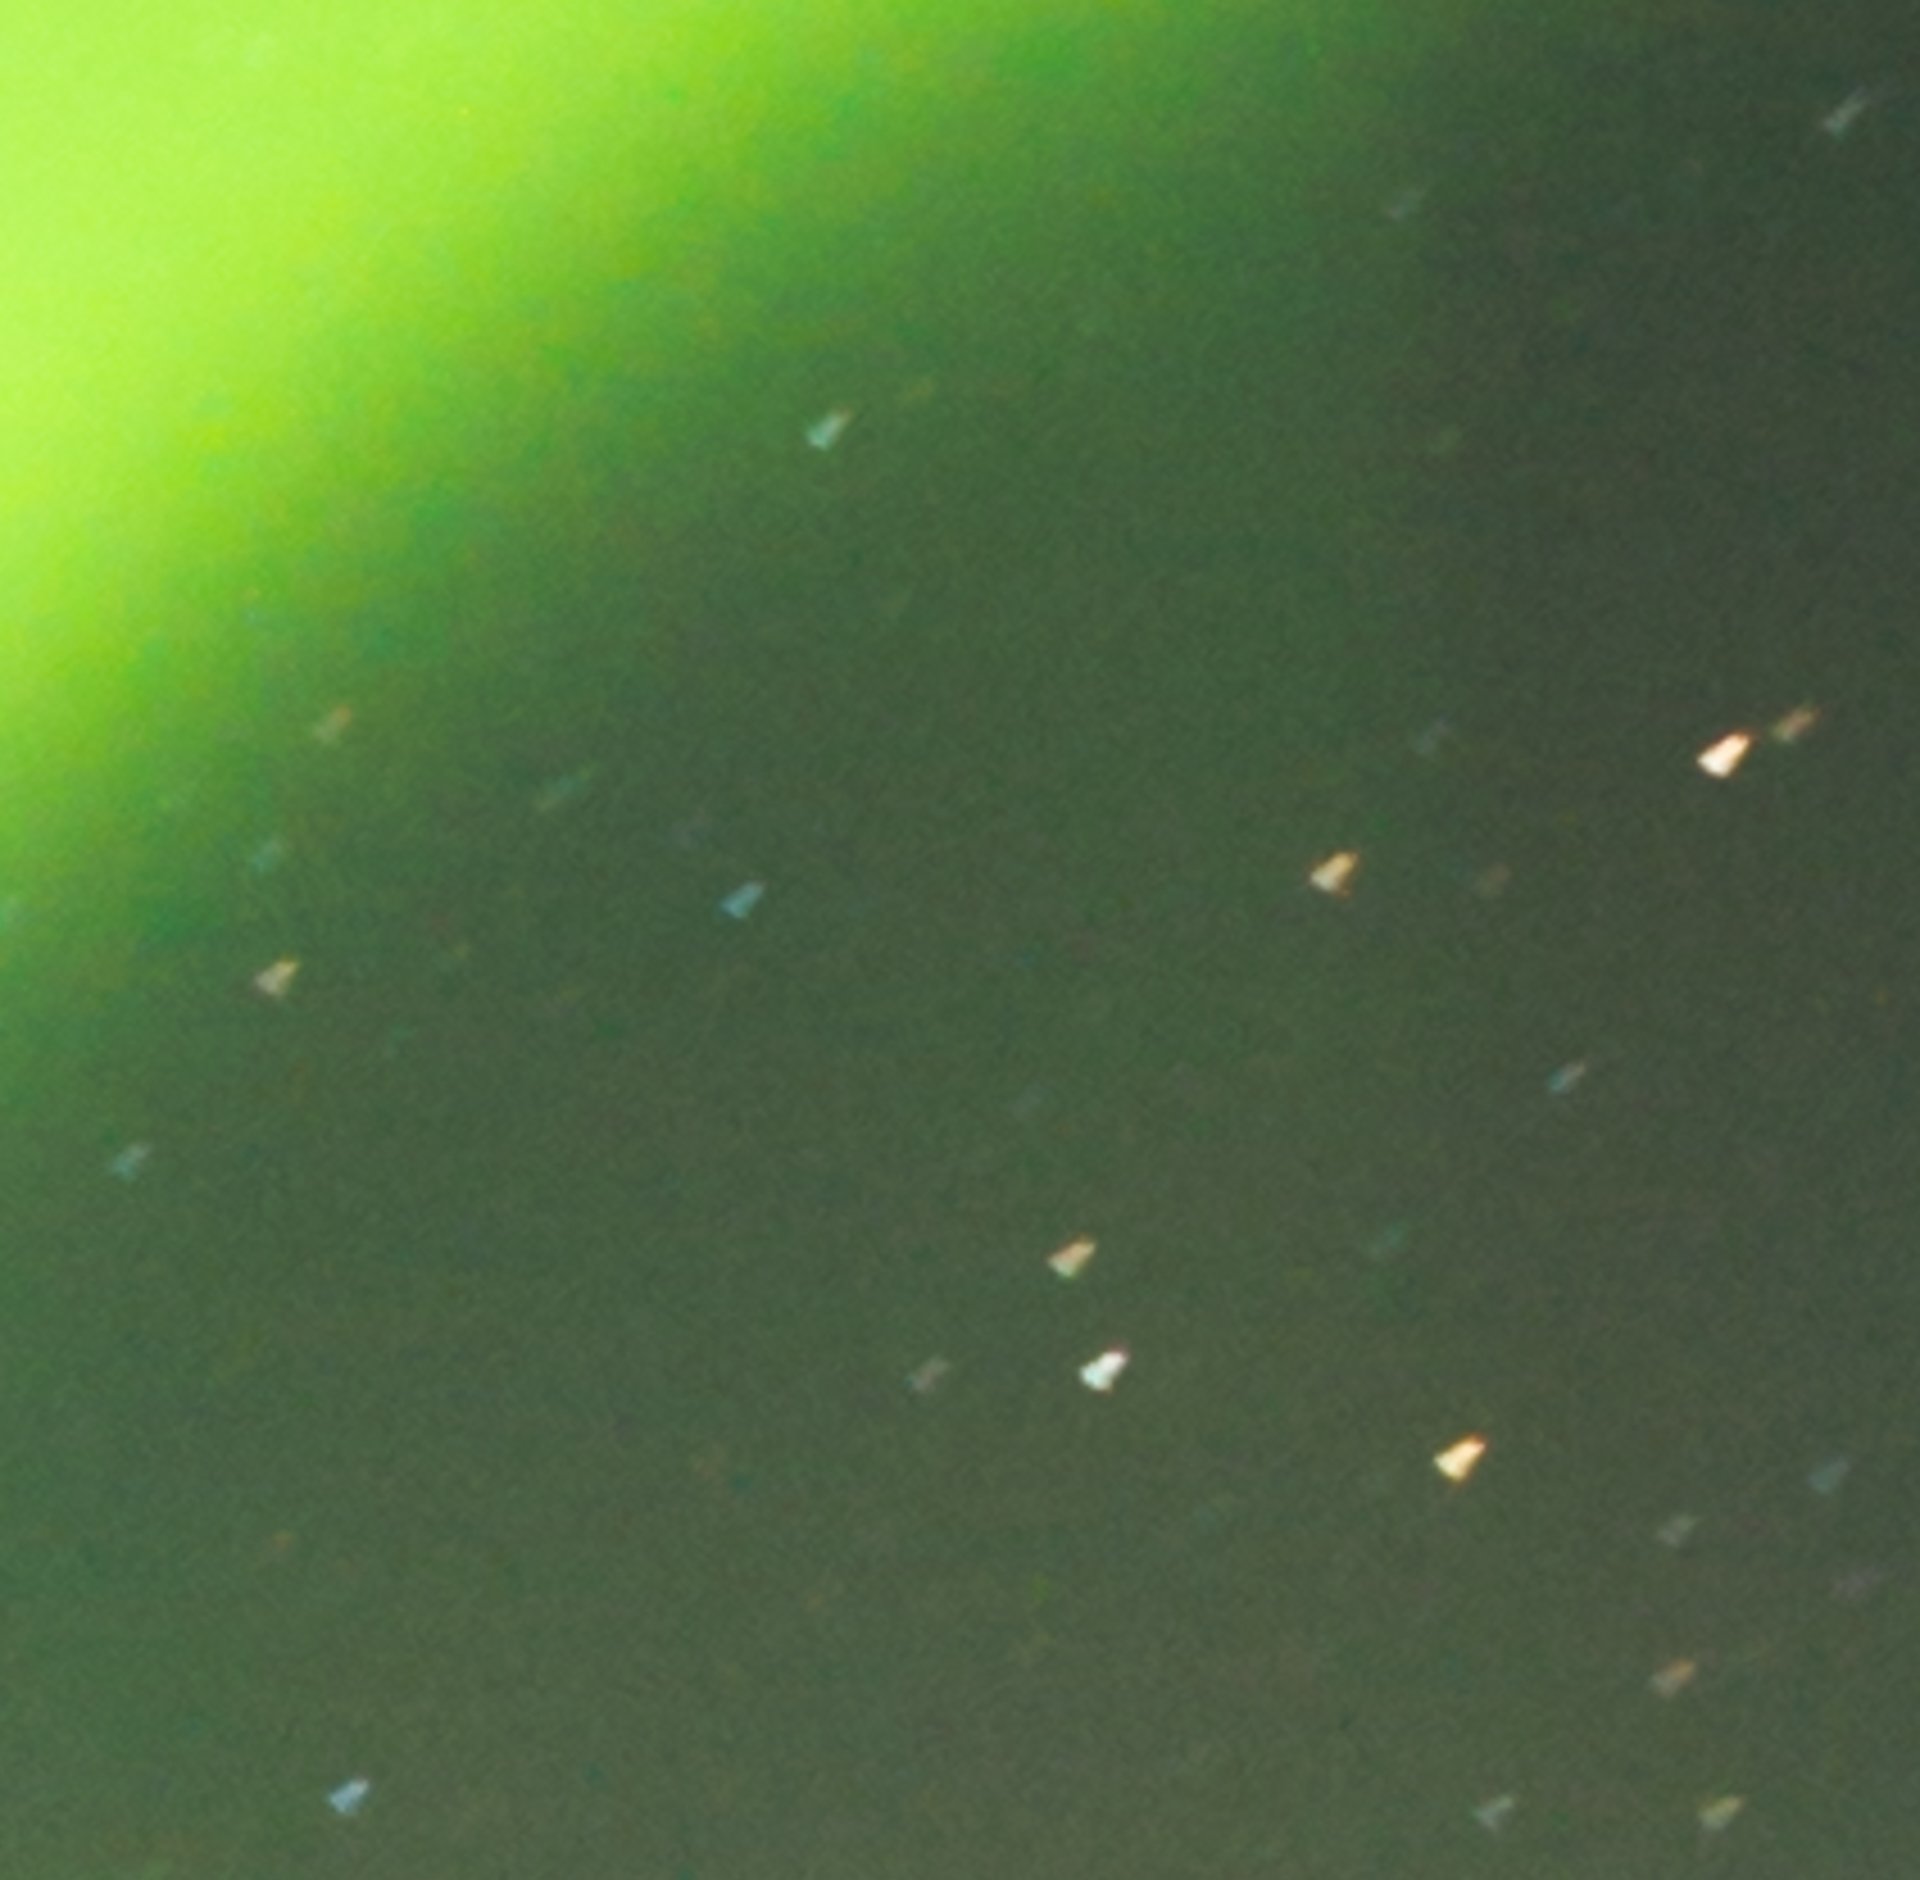
Here we have a reasonably sharp focus in the right crop, but in the same image we get unsharp stars. Furthermore, those triangular stars are very unattractive to my eyes. A lens that I would not recommend: the Tamron 15-30mm f/2.8, which I got especially for my first time photographing the northern lights.
Shutter speed
Next up is the shutter speed. Because the Earth spins on its axis, we have a day and night cycle on this planet. The Earth’s rotation is faster than you would think too. You can see it in your nightscape photos. Just expose an image for 30 seconds and zoom in to see the stars streak or trail. The maximum shutter speed is therefor limited by the Earth’s rotation.
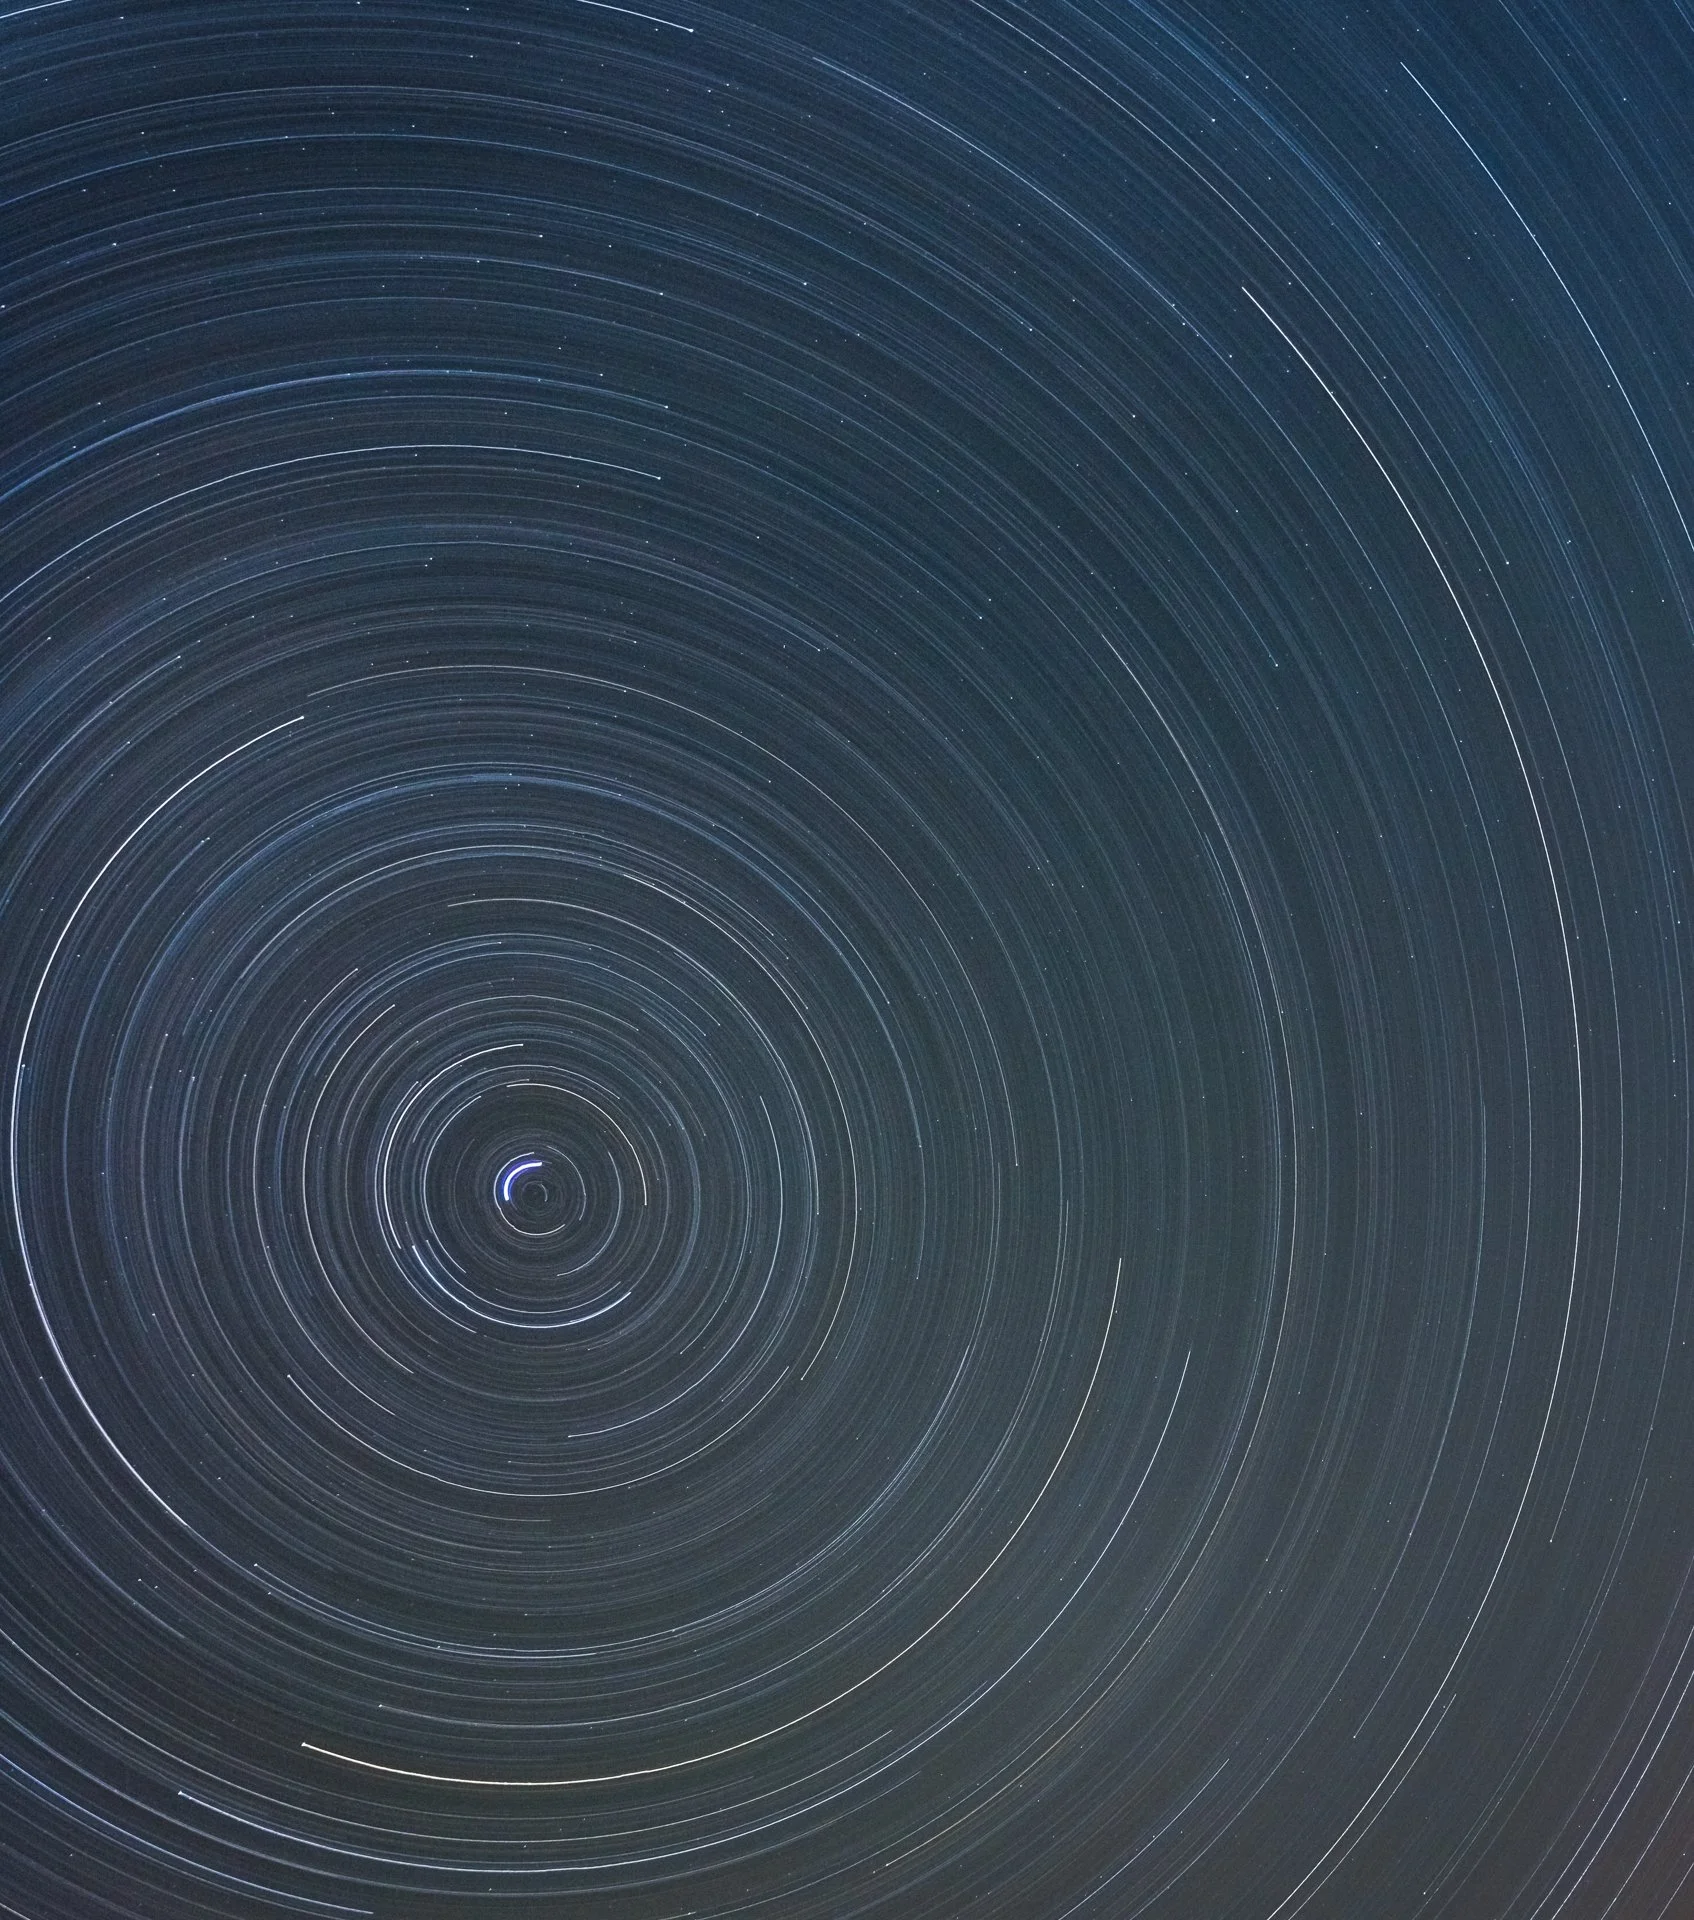
Star trails can either be a goal or an effect to omit. Here’s a single shot I did while slewing the tracker forward during exposure. It didn't come out that good, but for illustration purposes, this is what happens when you select a longer shutter speed.
Introduction to the 500-rule
A shorter (wider) lens will show less of that rotation and streaking than a longer lens. That’s why many nightscape photographers prefer a wide-angle lens with a large aperture. But you can use any lens as long as you consider the (ancient) 500-rule.
500 divided by the focal length times the crop factor is your maximum shutter speed in seconds.
That means that on a full-frame camera, you can go as slow as 35 seconds on a 14mm ultra wide angle like the Samyang 14mm f/2.8, or 14 seconds on the highly regarded Sigma 35mm f/1.4 Art.
Consider large megapixel cameras and crop factors
My personal opinion is that even those settings don’t cut it. 35 seconds at a 14mm focal length still shows a little streaking if you zoom to a hundred percent magnification in post-processing. That’s because the 500 rule is dated at best. A modern 40 or 60 megapixel camera is a very different beast than a 4 megapixel unit from the late 1990’s. In fact, I would contend that there is little benefit to lengthening the exposure time at all as the stars do not stay in “one place”. The light of that tiny area in the night sky does not build up over time; which is exactly what a longer exposure is useful for.
So what do you do instead? You could go all scientific and use Frédéric Michaud NPF rule, which incorporates pixel pitch and aperture aside from focal length alone:
((35 x aperture) + (30 x pixel pitch)) / focal length is your maximum shutter speed in seconds.
Pixel pitch is your camera’s number of pixels on the long edge, divided by the sensor’s physical width in millimeters, then multiplied by 1000. Let’s check what my maximum shutter speed would be on my Nikon Z7 paired with my Sigma 14-24 f/2.8 at 14mm.
((35 x 2.8) + (30 x (35,9 / 8256 x 1000))) / 14 = 16,3 seconds16 seconds is a whole lot shorter than the 35 seconds that the 500-rule gives you. And it works:
500 rule vs NPF rule
Lens choice
Because the shutter speed is such a limiting factor, how can we get great results without getting into even more technical detail than the already very complicated NPF rule above? The secret is something called clear aperture. Lenses that have a physically big opening to allow light through, are generally the best for landscape astrophotography, but that opening has to be free of defects and engineered within the tolerances allowed by the lens specification. In other words, clear aperture is how big the useful amount of glass is inside the smallest physical opening of your lens.
The larger the surface area of that opening, the more light a lens can gather. But the focal length also directly determines how long the exposure can last before stars visible show trails. That leads to a way to score lenses for nightscapes. The wider the lens and the larger the aperture, the better.
The best lens for landscape astrophotography (nightscapes)
Here are a few recommendations for nightscapes. These lenses have a great clear aperture, shoot wide and offer very little lens defects like coma if any:
Sigma A 14mm f/1.8 DG HSM
Samyang XP 14mm f/2.4
Samyang 14mm f/2.8
Samyang 24mm f/1.4
Sigma A 35mm f/1.4 DG HSM
Sigma A 14-24mm f/2.8 DG HSM
Nikon 14-24mm f/2.8
Canon 16-35mm f/2.8L III USM
Sony 35mm f/1.4 GM
That concludes level 1, the primer for this article. That’s why it is also the longest. I promise the next levels will be more concise but it was needed in order to lay a foundation for the remainder of this story.
Level 2: Getting the most out of your camera
Before you start investing in a new lens or even a new system based on recommendations above or on another website, you might be interested to know that there are ways to get better looking nightscapes with your current gear.
Raw settings
For any sort of photography, you should check or change your camera’s settings. By default, most cameras save space on your memory card by not recording the absolute maximum amount of data. In order to get more leeway in post-processing and therefore better quality results, you should check if you’re currently shooting in the raw-format (not RAW, it’s not an abbreviation). Next, I want you to flip through the deepest of your camera’s menus with the help of its manual. Set the raw mode to uncompressed and choose the highest possible bit depth your camera allows. Sometimes color space options such as sRGB or AdobeRGB will be available in you camera. They don’t matter if you shoot raw.
Knowing the limits
Each camera is very different from the other. I shot Canon and mostly Nikon throughout my career and that’s why I know from first-hand experience that you should treat them differently. Especially at night. For Canon shooters reading this: never underexpose your images. If you recover shadow detail in post-processing, you will be increasing noise more than you would by increasing the ISO in the field. For Sony, Fujifilm and Nikon shooters using a modern camera, I want you to pay close attention next.
ISO invariance
If a sensor’s signal gets amplified after light is gathered, as it does with the above brands and possibly a few more, then it would not matter if you increase the exposure in post-processing or in camera.
That indifference of whether you bump the ISO in-camera or increase the exposure slider in Lightroom is called ISO invariance. Actually, your results will be much better if you set the ISO to the high base setting as opposed to blasting the ISO to 6400 or higher; a common practice among nightscape photographers.
Most ISO invariant cameras have 2 or 3 base or gain ISO settings. A high base setting is the ISO value at which your camera switches its electronics to high gain settings. A few examples. My Nikon D750’s best ISO setting for landscape astrophotography is ISO 800. For my mirrorless Z7, that setting is ISO 400. I then increase the exposure in post-processing to the point I’m happy with how certain areas look.
Shooting and processing like this has a few pros and cons:
You can not see the composition well or at all on your camera after the exposure completes (it’s too dark to see).
There is much more dynamic range at lower ISO settings. That means more color information, more luminance information and a better signal to noise ratio (SNR), which we will get into later.
You are better able to protect the highlights with lower ISO settings, while the shadow detail gets the exact treatment. Increasing the ISO has the same effect as increasing the exposure slider in Lightroom.
The hard part is actually getting to know your camera’s ISO invariance, because It is not mentioned in your cameras manual. But you can look it up online at photonstophotos.net. They offer dynamic range charts for many cameras. To see if your camera is more or less ISO invariant, the pattern to look out for is a linear graph. One that goes down in dynamic range as ISO increases. Look if there is a bump in there where dynamic range increases when you increase the ISO. That is the ISO value to be shooting at at night.
Level 3: Twilight blending
We now have done everything we can to produce better nightscape images with the gear you have, using only a single shot. But what if I told you that you could get way better quality landscapes astrophotos by using multiple images?
I am not talking about composites here, where we replace the sky above the landscape with something from another location. No, we’re talking about shooting multiple images from the exact same location and with the exact same composition.
Signal to noise ratio (SNR)
The downside of shooting at night is that you HAVE to increase the ISO in one way or the other, even if you have an ISO invariant camera. The latest cameras have a low base ISO of 64 or even 50, at which the dynamic range is simply huge. 12, 13 and even 14 stops of recoverable difference between shadows and highlights is now possible. So how do you leverage that technological advance while shooting at night?
Well, you don’t. In the depth of night, there is simply too little information (actual light) coming from the foreground unless it is illuminated. That’s why many photographers opt for light painting the foreground to actually see some detail in there.
I don’t care for artificial light in my photos unless it’s a person holding it somewhere distant.

Another method of increasing detail or signal while keeping noise low, is shooting during moonlight or twilight. And these methods are by far the easiest and most successful step you can take at this point is to create more interesting nightscapes.
Both moonlight and twilight have the downside that the sky will become washed out and most stars rendered invisible. That’s why you have to get creative. You shoot one image for the sky, and another for the foreground. You could even apply focus stacking for the foreground at twilight to get some really dramatic results!
Common settings for twilight blending:
Sky - ISO 6400 (or much lower for ISO invariant cameras), f/2.8, 20 seconds.
Foreground - ISO 100, f/14, 2 minutes.
Patience and persistence
I blame social media for wanting quick results. Landscape photography used to be a means to get absorbed in this wonderful hobby of ours. Nowadays, most of us want to score with as many “bangers” as possible in the shortest amount of time. And so when I teach about blending images, the resistance is more about taking the time to perfect a shot than practicing new techniques. In order to do this or any other type of landscape photography well, patience is required. Why exposure a foreground for 2 minutes when you can do it in 10 seconds at a higher ISO? One word:
Quality
Types of twilight and astronomical night
When we talk about twilight, it’s impossible to omit a short discussion of the types of twilight. There are a few:
Civil Twilight - When the sun is between 0 and 6 degrees below the horizon.
Nautical Twilight - When the sun is between 6 and 12 degrees below the horizon.
Astronomical Twilight - When the sun is between 12 and 18 degrees below the horizon.
Before continuing, I highly advise you to wait for astronomical night before taking pictures of the night sky and the Milky Way in particular. Astronomical night occurs after (or before) the sun dips below 18 degrees below the horizon. That way, sunlight is not scattered in the Earth’s atmosphere anymore and you get the best possible contrast for observations and photos of the stars.
Please note that your geographical location and season affect the duration of each phase of twilight. During the summer months, I can’t even shoot a decent night image of the Milky Way back home in the Netherlands. That’s because there is no astronomical night during summer over my home country. In Iceland, the landscape photographer’s dream location, summer nights are even brighter and above the arctic circle, the sun doesn’t even set in summer. Twilight can last the entire night up in the arctic, but around the equator, night comes crashing in after the sun has set. It really is that quick.
Please consult a website like timeanddate to get the twilight timetables for your location and date.
A twilight blend is best done by shooting a separate image during astronomical twilight for the most natural blend.
Those levels of twilight sound like the aren’t fading into one-another, but of course they do. It’s all a gradual transition. That’s why you have to take great care if you consider using techniques that take additional time like panoramas or focus stacks: the amount of ambient light will change.
Level 4: Stacking to reduce noise
Stacking to reduce noise is a whole different ballgame to photography. It is the same technique that NASA and other space agencies use to get those insanely detailed images from the deepest, farthest recesses of outer space.
In theory, the concept is simple. You put multiple images together to increase the amount of light gathered from faint sources.
But why wouldn’t a space telescope like James Webb or Hubble do it in one exposure that lasts hours, days, if not weeks? After all, they are free of the constraints that we have with our cameras back on Earth, right?
Not entirely. Digital camera sensors get warmer the longer they are in operation. So the longer the exposure, the warmer the sensor. And that introduces glitches into the electronic circuitry, which we see in the photo as a type of noise called thermal noise. Stacking is a way of taking way longer exposures, while allowing the camera to cool down in between exposures to get more detailed images and less noise.
Stacking is also a way to reduce signal noise; that pesky noise you get by increasing the ISO. That’s because noise is random, while stars are not. If you would average out 10 images, and each of those has random noise, the amount of noise in the averaged image is considerably less.
In terms of your camera mounted on a tripod, it is also a great way to get longer exposures than the rotation of the Earth will allow. That is because you can put multiple images together to form one simulated long exposure. Think of it like this: exposure length is nothing more than allowing light to build up over time to produce a photo. Putting two 20 second images together is effectively the same as taking one 40 second shot.
Registering
But the planet’s rotation will still shift each 20 second exposure. That’s why you would have to align your shots before doing any kind of stacking and further processing. That process of aligning stars over multiple frames is called registration, as your register the position of stars relative to eachother.
The frustrating part comes when finding software that does this well.
Photoshop sucks at registering star images. You need a plugin for that (I don’t know of one) or align them manually.
Deepskystacker is free, but it’s a 16-bit program. That’s why it will run out of memory and crash while registering large resolution and/or many frames.
Starry Landscape Stacker is great for what we are doing, but only runs on Mac and doesn’t read raw files.
Sequator is also great, but only runs on Windows. It has similar features as Starry Landscape Stacker does.
SiriL. is a relative newcomer. Free, but harder to use than the aforementioned programs. It is the best option if you have time, but not the money for the next ones.
Astro Pixel Processor and PixInsight are professional (and expensive) pieces of software that work really well, but have a learning curve that will deter even the most learned scientists.
Stacking is not linear
If you think 10 images in a stack will improve the image quality ten times, think again. The inverse square root applies here. That means that in or order to get a 10 time improvement in the image quality, you would need to shoot at least 10x10 = 100 frames. I’m saying “at least” because other factors can contribute to an increase in noise. Or maybe an airplane flies across the image in a few of those frames, which you then have to discard.
Quantity equals quality
It all comes back down to having patience. More images in the stack will give better results. Theoretically, you can try to get a 4x improvement in image quality by shooting 16 frames. Stacking those would be the same sort of result as by lowering the ISO 4 stops, from 6400 to 3200 to 1600 to 800 to 400.
Level 5: Tracking the rotation of the Earth
Buying a tracker for landscape astrophotography is arguably a better investment than buying a new camera or a better lens if this particular niche of landscape photography is your thing.
A tracker is a device that you put in between your tripod and ballhead that will electronically follow the rotation of the Earth at the push of a button, thus allowing way longer shutter speeds. Realistically, shutter speeds of up to 4 minutes using a single frame up to focal lengths of 135mm (!).
That means less images to go into the stack (or even no stacking at all), sharper night skies and more dramatic Milky Ways.
The downside with them is the time and concentration it takes when setting it up. Your tripod needs to be level, the mount needs to be polar aligned (pointed slightly off the north star in the northern hemisphere) and it needs to be properly fixed in place when putting the camera and lens on top in the dark. It’s a huge pain in the butt to do, but the results can be worth your while:
I have had first-hand experience with two trackers. The Fornax Mounts LighTrak II is the stronger one of the two, and leads to better results on heavier setups (DSLR with zoom lens). I found the iOptron Skyguider Pro Complete Package to be more user friendly. It has an illuminated polar scope built in, which helped me save time aligning the thing.
Masking and compositing
When you use a well aligned tracker, the night sky will be perfectly still, but the landscape will move in the opposite direction instead. Nightscapes can therefor be very hard to post-process. That’s the case with stacking as well - each subsequent frame will be shot with a different portion of the sky in the frame. And when you register those stars, the foreground will be all blurry.
That’s why you need to mask out the foreground. Software like Starry Night Stacker and Sequator can do that for you before registering your stars, but otherwise it’s highly advisable to have as little foreground in the night sky image as possible.
Location, location, location
Trackers, filters and stacking techniques do not compensate for being in a poor location for astrophotography. Getting away from light pollution is still your number one priority. It also gives you the opportunity to explore less traveled parts of the world and show more unique images.
Northern lights
These techniques here (stacking and tracking) are only useful for deep sky subjects. The northern lights are part of the Earth and change constantly. That’s why stacking is not useful at all. Tracking is more useful, but the longer the exposure, the more blurry the lights become. I find 15 seconds to be the sweet spot for the northern lights. And you do not need a tracker for that at 14mm. You might want to do that with longer focal lengths, but aligning the shit out of a tracker in frigid temperatures where the lights normally occur, while the best part of it happens during the alignment, but disappear after (Murphy’s Law), is frustrating at best.
Post-Processing Nightscapes
With nightscapes it’s impossible to avoid post-processing. Snapping a quick image of the stars and printing it is not what we are about here. That’s why I will offer a new and exciting post-processing tutorial about landscape astrophotography soon. Sign up to my newsletter if you haven’t already to receive an alert when it is available.